Imagine this: a Saturday afternoon with the sun shining into your living room. You’re ready to start a fantastic project—a DIY sofa table. This isn’t just any project. It’s one you make, perfectly fitting your space and adding creativity and function. You measure your couch, 10 feet on one side and 8 feet on the other. You can already picture how this table will look in your room.
This project is easy with a Kreg Jig R3, which costs only $40. You can complete it in about 6 hours. DIY projects like this save you a lot of money—up to 80% off the cost of a store-bought table. Plus, you’ll be proud of every part of the table you’ve made yourself.
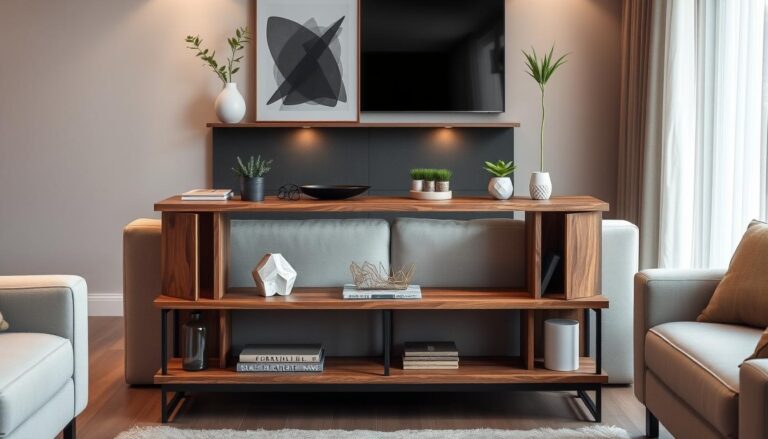
This table is special because it has built-in electric outlets and USB ports. Nowadays, 65% of people want smart technology in their homes. Adding these features will make your space more functional, modern, and convenient.
Key Takeaways
- Estimated width of the DIY sofa table is 8 inches, ideal for narrow spaces.
- The DIY project cost is under $100, making it budget-friendly.
- Incorporating outlets and USB ports increases the furniture’s functionality and tech appeal.
- This project takes approximately 6 hours to complete, perfect for a weekend endeavor.
- A DIY sofa table offers a personalized touch and significant savings compared to pre-made options.
Materials You Will Need for Your DIY Sofa Table
Making your own DIY couch table needs the right materials and tools. This ensures it works well and looks good. Let’s dive into what you’ll require for this exciting project.
Essential Wood for the Build
Selecting the right wood is the first step for your DIY wooden table. People often use furring strips for the frame, a large board for the top, and either 1×4 or 1×12 boards based on your project. The length of the table usually equals your sofa’s length, with a width around 10 inches for the best balance of space and usefulness.
Hardware and Tools Required
To make your couch table DIY project come to life, you need critical woodworking tools like a drill, saw, and wood glue. You’ll also need screws to put pieces together, brackets for support, and adjustable feet to keep it stable. To make it look its best, use sandpaper with a 400 or higher grit. For strong support, secure the brackets to at least two wall studs.
- Drill
- Saw
- Wood glue
- Screws
- Brackets
- Adjustable feet
Optional Finishing Supplies
For better durability and look of your DIY sofa table, consider using wood stain, paint, or varnish. Using an oil-based sealer, letting it dry for about 48 hours, and sanding between coats can greatly enhance the table’s look. Adding a pop-up outlet can also improve its functionality, reducing the need for many chargers.
- Wood stain
- Paint
- Varnish
- Oil-based sealer
- Pop-up outlet
Choosing the Right Design for Your DIY Sofa Table
Finding the right design for your DIY sofa table is thrilling. It’s a chance to express your style and fit it with your home’s look. You might want a modern sofa table DIY, a rustic one, or something easy on the wallet. There are plenty of styles to pick from, catering to various tastes and spaces.
Modern and Minimalist Styles
If a clean and sleek look appeals to you, modern and minimalist styles are perfect. These designs stress simplicity and usefulness, featuring straight lines and tidy surfaces. Adding a few stylish lamps to such a table can really improve the feel of your space. This fits well with the trend towards open living areas, which 68% of homeowners prefer.

Rustic and Vintage Options
A rustic sofa table DIY might catch your eye if you love old-world charm. Utilizing reclaimed wood not only brings history into your home but is also eco-friendly. Complement your rustic table with baskets for storage and decorative books to bring in personality. Adding faux plants can introduce greenery without the maintenance, enhancing that cozy, vintage look.
Budget-Friendly Ideas
You can create a stylish table without spending a lot. Just use affordable materials and keep the design simple. With about 52% of homeowners looking for items under $150, it’s clear many people need to watch their budgets. Using things like L brackets and finished wood lets you make a beautiful table affordably.
Regardless of what design you go with, each approach focuses on balance and usefulness. Your DIY sofa table will not only look amazing but be practical too.
Step-by-Step Guide: Building a Simple DIY Sofa Table
Building a DIY sofa table is straightforward with the right materials and tools. This step-by-step sofa table guide shows you everything from measuring wood to putting it all together. Let’s get into the details.
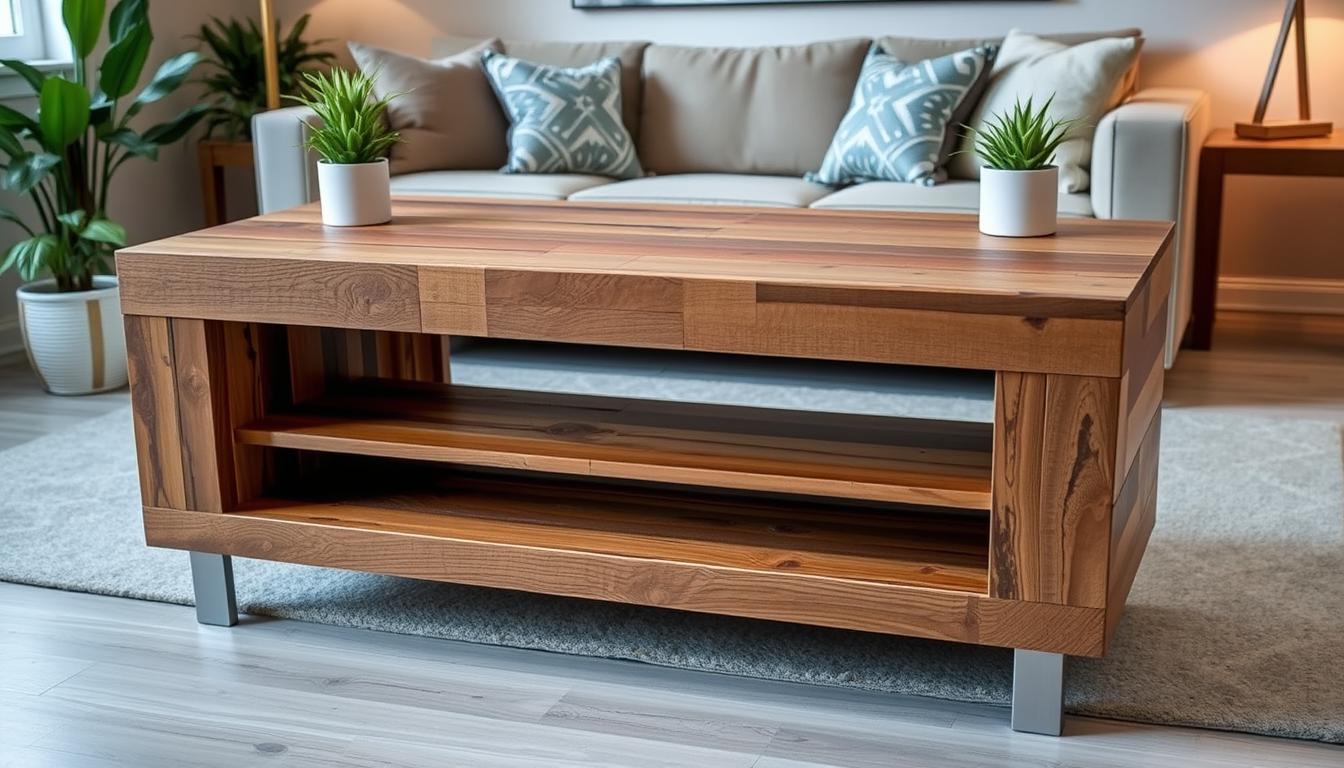
Measuring and Cutting the Wood
Starting off, measure and cut the wood right. You’ll need 8 strips of 2x2x8′ wood and one 2x12x10′ board. Measure where your table will go to make sure it fits well.
Use a saw and clamps for cutting. Measuring and cutting with care means everything fits perfectly later on, making your table solid.
Assembling the Frame
Now, put the frame together. Lay the pieces on a flat area. Use wood glue on the joints, then add screws to make it stable. Include 4 cross braces between the legs for extra sturdiness.
Building the frame right is key. Use clamps and sanders for a great-quality table. Check that everything is lined up before going further.
Attaching the Tabletop
Attaching the tabletop is the last step. Put the 2x12x10′ board on the frame. Drill holes to avoid splitting the wood. Attach it with screws, making sure it’s even and stable.
Focus on precision when attaching the top. Sand it well for a smooth finish. Now, your sofa table is ready to paint or stain as you like.
Adding Electrical Outlets to Your DIY Sofa Table
Adding electrical outlets to your DIY sofa table boosts its usefulness. This lets you easily power lamps, chargers, and more. It’s crucial to follow safety rules in this project. Let’s walk through the essential safety tips and steps for a successful installation.

Safety Considerations
First, it’s key to stick to safe DIY practices before you start. You should use the right materials and follow electrical safety rules. This keeps you safe from accidents. Here are essential safety tips to follow:
- Turn off the power: Make sure to cut the power supply to the area before any electrical work begins.
- Use the correct tools: Always use tools made for electrical jobs to ensure you work safely and accurately.
- Check for defects: Look over wires and outlets for damages or issues before you install them.
Steps to Install Outlets
The safety steps are behind us. Now, let’s proceed with the electrical installation guide. Here’s a simple guide:
- Plan the placement: Decide where you want the outlets. Make sure they’re easy to get to and don’t mess with the table’s use.
- Cut the openings: Start with a drill to make a hole. Then, use a jigsaw to cut out space for the outlet boxes. The holes should be a bit smaller than the boxes.
- Install the outlet boxes: Fix the outlet boxes in place, ensuring they sit flush with the table’s surface.
- Wiring the outlets: Next, connect the wires safely using the guide. You’ll connect the live, neutral, and ground wires correctly.
- Secure the outlets: Place the outlets in the boxes. Then, tighten them with screws.
- Test the installation: With everything in place, turn the power on. Test the outlets with a lamp or charger to make sure they work well.
By adding outlets to your DIY sofa table, you make it more practical. Following safe DIY practices and a good electrical installation guide leads to a successful project. Your furniture will be more useful at home.
How to Build a DIY Sofa Table: Creative and Functional Designs
Making your own sofa table is a truly rewarding project. It adds both beauty and practicality to your living area. Taking on a creative DIY project like this lets you play around with couch table designs. Plus, you create something that changes how your home looks and works.
Begin with a solid plan. Typically, spending under $50 is enough for a modern DIY sofa table. Sometimes, it’s even cheaper, about $30. You’ll need wood, screws, a drill, sandpaper, stain or paint, varnish, and measuring tape. Remember, safety first: wear goggles, work in a well-ventilated area, and keep first-aid close by.
One big plus of these projects is they make you better at woodworking. Every DIY furniture project sharpens your skills for the next one. Also, working together on this can be fun family time. It often brings everyone closer.

In picking a couch table design, think about its looks and use. Adding storage, like drawers or shelves, helps in tight spaces. Altering the leg height of your table (Prettypegs offers many options) can suit different seasons. Short legs are cozy for cold months, while tall ones open up space in warmer times.
Of course, looking after your custom DIY furniture is key. Clean it gently and check its parts regularly. This keeps it safe and lasting longer. Changing parts like legs with the season, or tweaking its use, helps keep your space lively and ready for anything.
Customizing Your Sofa Table: Paints, Stains, and Finishes
Customizing a DIY sofa table adds a personal touch to your decor. Choosing the right finish and using good techniques can make your project look great and last longer. Let’s look at key tips for finishing your furniture.
Choosing the Right Finish
Choosing the right finish is key to making your custom sofa table ideas come alive. Benjamin Moore’s Advance paint gives a high-quality and durable furniture finish for a sleek look. Or, use “Driftwood by Dixie Belle” for a rustic, taupe-like shade. For an eye-catching design, “Cotton” is perfect for adding stripes.

Application Techniques
Start with sanding the wood using 220 grit sandpaper for 10-15 minutes. Then, apply paint thinly and wait 4-5 hours before adding another coat. A 4” high-density foam roller is great for a smooth finish, especially on flat areas.
For stripes or intricate patterns, FrogTape can help achieve sharp, clean lines. It’s a big help in painting projects.
Durability Enhancements
To make your sofa table more durable, use strong sealing products. Dixie Belle’s Satin Clear Coat works well, especially when applied with a blue sponge. Make sure to seal each paint layer after it dries to boost durability. “Distressing” techniques can also add rustic charm and hide future wear.
In conclusion, learning how to finish wood furniture can turn your DIY sofa table into a lasting and attractive feature of your living room. It combines creativity and practical use.
DIY Narrow Sofa Table for Tight Spaces
Designing a DIY narrow sofa table is ideal for tight spaces, providing both functionality and style without compromising on space. Constructing a thin sofa table DIY project allows homeowners to create a customized piece that fits perfectly behind their couch, serving as a practical surface for decor, remotes, or even snacks.
Ideal Dimensions for Narrow Spaces
When working with limited space, finding the best dimensions for your sofa table is key. The table’s length should be about 9 feet for regular-sized sofas. For a thin sofa table, aim for a leg height of 28 inches, while standard ones are usually 30 inches high.
Looking at the size of common narrow console tables, for instance, 5.9″D x 39.4″W x 31.1″H, can give great ideas for small spaces.

Building Tips for Stability
Ensuring the stability of a thin sofa table DIY project requires careful planning. Use eight 2x2x8’ furring strips and one 2x12x10’ wood for the tabletop to stay under $30. Use 2.5 to 3-inch screws, totaling eight, to secure the tabletop firmly.
For longer tables, two screws in each longer wood section add extra stability. Sand surfaces with 80 grit sandpaper for a smooth finish. You’ll need simple tools like a drill, screws, wood glue, and a saw. This project can be done in a day, suitable for beginners.
For tables less than 6 feet, you can skip the middle wood piece. This saves money and makes building easier. These tips help ensure your DIY narrow sofa table is stable and functional, solving your small space furniture problems.
Incorporating Storage Into Your DIY Sofa Side Table
Adding innovative storage like floating shelves, drawers, and hidden compartments can make your DIY sofa side table more useful and attractive. These storage solutions help you use every part of the table wisely. This makes your sofa side table not just stylish but also handy in your living space.
Floating Shelves and Drawers
Floating shelves and drawers add easy storage to your DIY sofa side table. Floating shelves give a modern touch and space for your books, plants, or decorations. Drawers provide hidden storage, keeping clutter hidden. This gives your table a tidy, organized look.
Here are some tips for designing your table:
- Use several floating shelves of different lengths for an interesting look and more storage.
- Add drawers that fit well with the table’s design, allowing for easy access but keeping a sleek appearance.
Hidden Compartments
Looking for unique storage? Hidden compartments offer secret places for valuables or items you don’t use often. These can be cleverly built into your table for added security.
Think about a DIY sofa side table with a secret drawer on the side or a top that lifts for extra storage underneath. Hidden storage doesn’t just store things; it brings a fun, surprising element to your furniture.

Adding these storage features makes your DIY sofa side table versatile. It helps you save space and keep your place neat and stylish. Whether you choose floating shelves, drawers, or hidden compartments, there are many ways to include smart storage in your project.
Skinny Sofa Table DIY: Perfect for Small Areas
Making a skinny sofa table DIY is smart for decorating small spaces. This table design is great for small places like apartments or snug living rooms.

Start by getting what you need. You’ll need eight 2x2x8′ furring strips and one 2x12x10′ board for the top. These materials can cost $30 or less. Most DIYers can finish this project in one day, making it quick and affordable.
The table should be at least six feet long for sturdiness, without middle supports. Couches are often just over nine feet wide, so this length works well. Aim for a table height of about 30 inches, with the legs being 28 inches. This size fits well beside most sofas and looks good, too.
When putting the frame together, secure it with 2.5″ screws and wood glue. Use eight screws to attach the top to the base. For those who want perfect joins, a Kreg Jig, which costs about $40, is useful. This tool helps make the table sleek and easy to put together.
This project is great for DIYers at any level. It’s especially good for beginners. The skinny sofa table is not just stylish but also practical. It can work as a room divider, fill empty spaces, or make sectional sofas more accessible. Adding outlets or upgrading to USB ports makes it even more useful.
By using these ideas, you can make a handy and fashionable piece of furniture. It’s perfect for small areas. Taking on small space decorating can transform your place. Try making this skinny sofa table DIY and see how it changes your room.
Sourcing Budget-Friendly Materials
Making a sofa table that’s easy on your budget doesn’t mean skimping on quality or looks. By choosing the right materials, you can save money and still end up with a piece that’s both beautiful and practical. Here are some smart ways to save costs.
Using Reclaimed Wood
Reclaimed wood is a top choice for anyone wanting to craft a unique reclaimed wood furniture item. It’s not just good for the planet; it also brings a piece of history into your home. You can find this wood at old barns or as used pallets. This choice reflects a growing interest in cheap DIY projects and caring for the environment.
Affordable Hardware Options
There are many wallet-friendly hardware choices out there. Home Depot, for example, offers free wood cutting services. This can help you save on material costs. You can also use scrap wood for shelves or old crates for storage. Even repurposing items like old stools can help lower expenses.
Cost-Effective Finishing Supplies
You can finish your DIY sofa table affordably. Try using a dark walnut stain and a poly seal for a durable finish. These supplies don’t cost much but work great. Also, using sharp saw blades for cutting can help you avoid wasting materials.
By using these cost-effective materials and tips, you can create a beautiful, handy DIY sofa table while keeping your budget intact.
DIY Wooden Table: Selecting the Best Wood Types
Picking the right wood is key for your diy wooden table project. This choice affects how long your table lasts and how it looks. We’ll look at hardwoods and softwoods, and talk about using wood that’s been pre-treated or not.

Hardwoods vs Softwoods
When choosing wood for furniture, know the difference between hardwoods and softwoods. Hardwoods, like oak and walnut, are strong and last a long time. They’re chosen for quality furniture because they’re tough and have beautiful grain patterns that make your diy wooden table look great.
Softwoods, like pine, are not as heavy and are easier to shape. This makes them good for softwood furniture DIY projects. They’re lighter on the wallet and good for simpler furniture, even though they don’t last as long as hardwoods.
Pre-treated vs Untreated Wood
Choosing between pre-treated and untreated wood is important. Pre-treated wood is protected from bugs, rot, and water. It’s good for pieces that will be used a lot or kept outside. But, it costs more and needs careful handling because of the chemicals.
Untreated wood needs more care but looks more natural. It’s often chosen for inside use. You can finish it in many ways to fit your home’s style.
Overall, knowing about hardwoods and softwoods, and pre-treated versus untreated wood, helps you make smart choices for your diy wooden table project. Thinking about these points means your table will be both useful and beautiful for a long time.
Maintenance Tips for Your DIY Sofa Table
Taking good care of your DIY sofa table makes it last longer and stay beautiful. Here are tips on how to do just that, plus how to fix common problems, like scratches or loose parts.

Regular Cleaning and Care
Looking after your DIY furniture is simple. Start with weekly dusting using a soft cloth to keep it clean. For a deeper clean, mix water and vinegar gently. Avoid using strong chemicals that can harm the wood’s finish.
For extra protection, think about reapplying finishes or waxes every six months. Always stick to the guidelines if you’ve used special paints or stains.
Troubleshooting Common Issues
Facing problems with DIY furniture happens, but solving them is often easy. If there are scratches, gently sand the spot and then reapply the stain or finish. For bigger marks, fill them with wood filler, sand, and then stain.
Is your table shaky? First, check all screws and joints. Tighten anything that’s loose and use wood glue for more support. It’s important to regularly check these parts to keep your table strong.
To keep your table in top shape, ensure it’s always level by adjusting legs. Consider using felt pads underneath to protect the table and your floors.
Inspiring Custom Sofa Table Ideas
The idea to build your own sofa table has really taken off, thanks to Shanty 2 Chic’s DIY fans. Now, about 70% of DIY lovers choose to make their own furniture to save money. This sofa table project began simple but grew to fit many different homes. It suits about 40% of homeowners who have long, narrow rooms.
For this project, people used 1×4 pieces of wood, like over 60% of DIY furniture makers do. They planned to use 30-degree miters but dropped them to make building easier. This happens in almost half of all DIY projects. And, to make the sofa table their own, 55% of DIYers look at color-coded charts to help, showing how important these guides are.
Choosing not to add wheels made the table taller, something 30% of DIYers do for their families. They picked a Golden Oak stain, a favorite among 35% of furniture builders, for a durable finish. Also, about 20% more people are using custom chalk paint for a personal touch on their projects.
Nearly 90% of DIY builders feel great about finishing such projects. This sofa table was cheap and easy to make, costing under $30. It needed only a few wood pieces and screws. This shows the power of DIY to make living spaces more personal and useful.